RSS Feed

Category Archives: Recipes

Clam Linguine with Greenery

Posted on
IMG_9928

Clam Linguine with Greenery by Kitchenette Finds

When days turn snowy we seem to reach for the foods that have comforted us in winters past. I’ve been making clam linguine from my grandmother’s recipe for the last couple of decades and it’s a favourite of my son and my best friend, two of the most important people in my life. While I want to feed and comfort them, I also feel the need to nourish them and keep them healthy. Over the years, I’ve tweaked frequently cooked dishes to be a bit healthier while still maintaining the textures and flavours that made them staples at our table.

IMG_9945

Lassette helping herself

I’m always trying to work more green vegetables into meals and one day when I was picking up supplies for Clam Linguine, I thought about how it’s the only time I like to use lots of parsley in a dish. Realizing that it was because the parsley absorbed all the other flavours, I wondered if kale wouldn’t just do the same thing. By quickly blanching the kale in the pasta water before adding it to the pan and reducing the amount of pasta, it added lots of vitamins and nutrients without taking anything away from a beloved dish.

IMG_9935

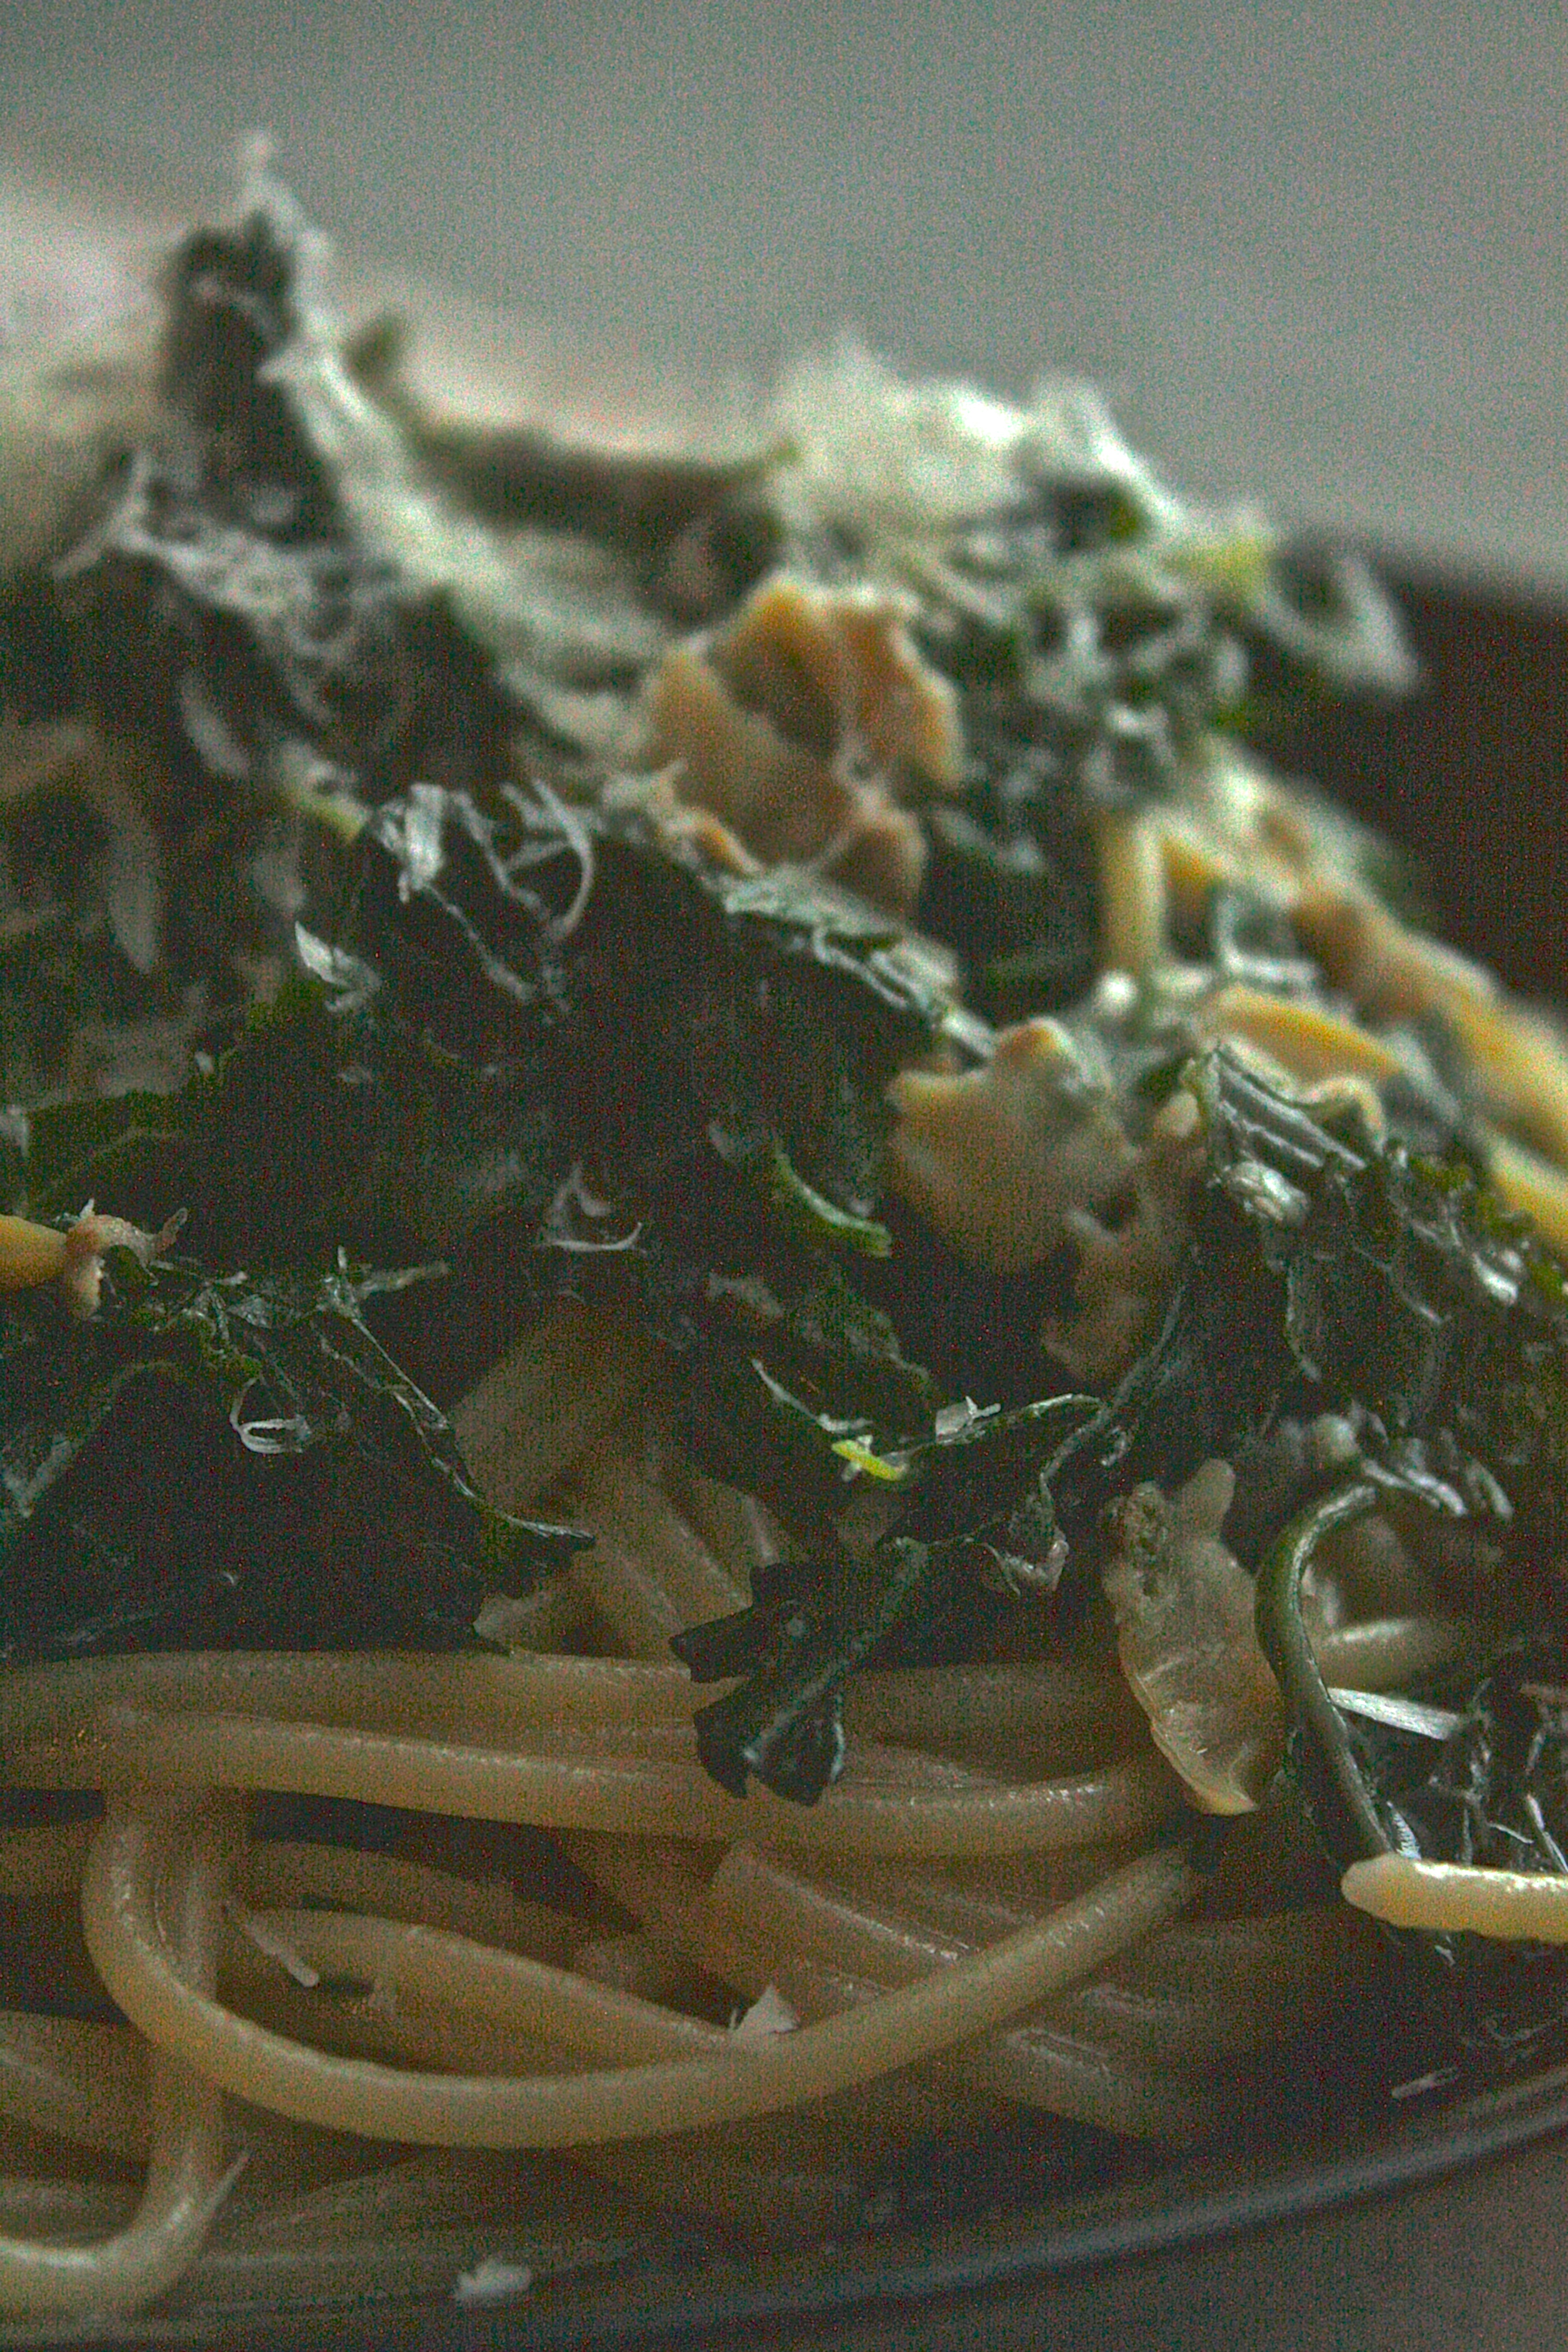
Detail of Clam Linguine with Greenery by Kitchenette Finds

When I tested the altered pasta dish on my son, he approved and ate about half of a bunch of kale! When I made a lunch date with my best gal where she wanted to make Clam Linguine together at her place, I figured it was a great chance to test out the changes on a “mature” palate. With a splash of Wayne Gretzky wine, I dished up the greener version of the recipe we’d been cooking together since high school and got our daily greens with a side of witty banter.

Recipe for Clam Linguine with Greenery

makes 2 very generous servings

Ingredients:

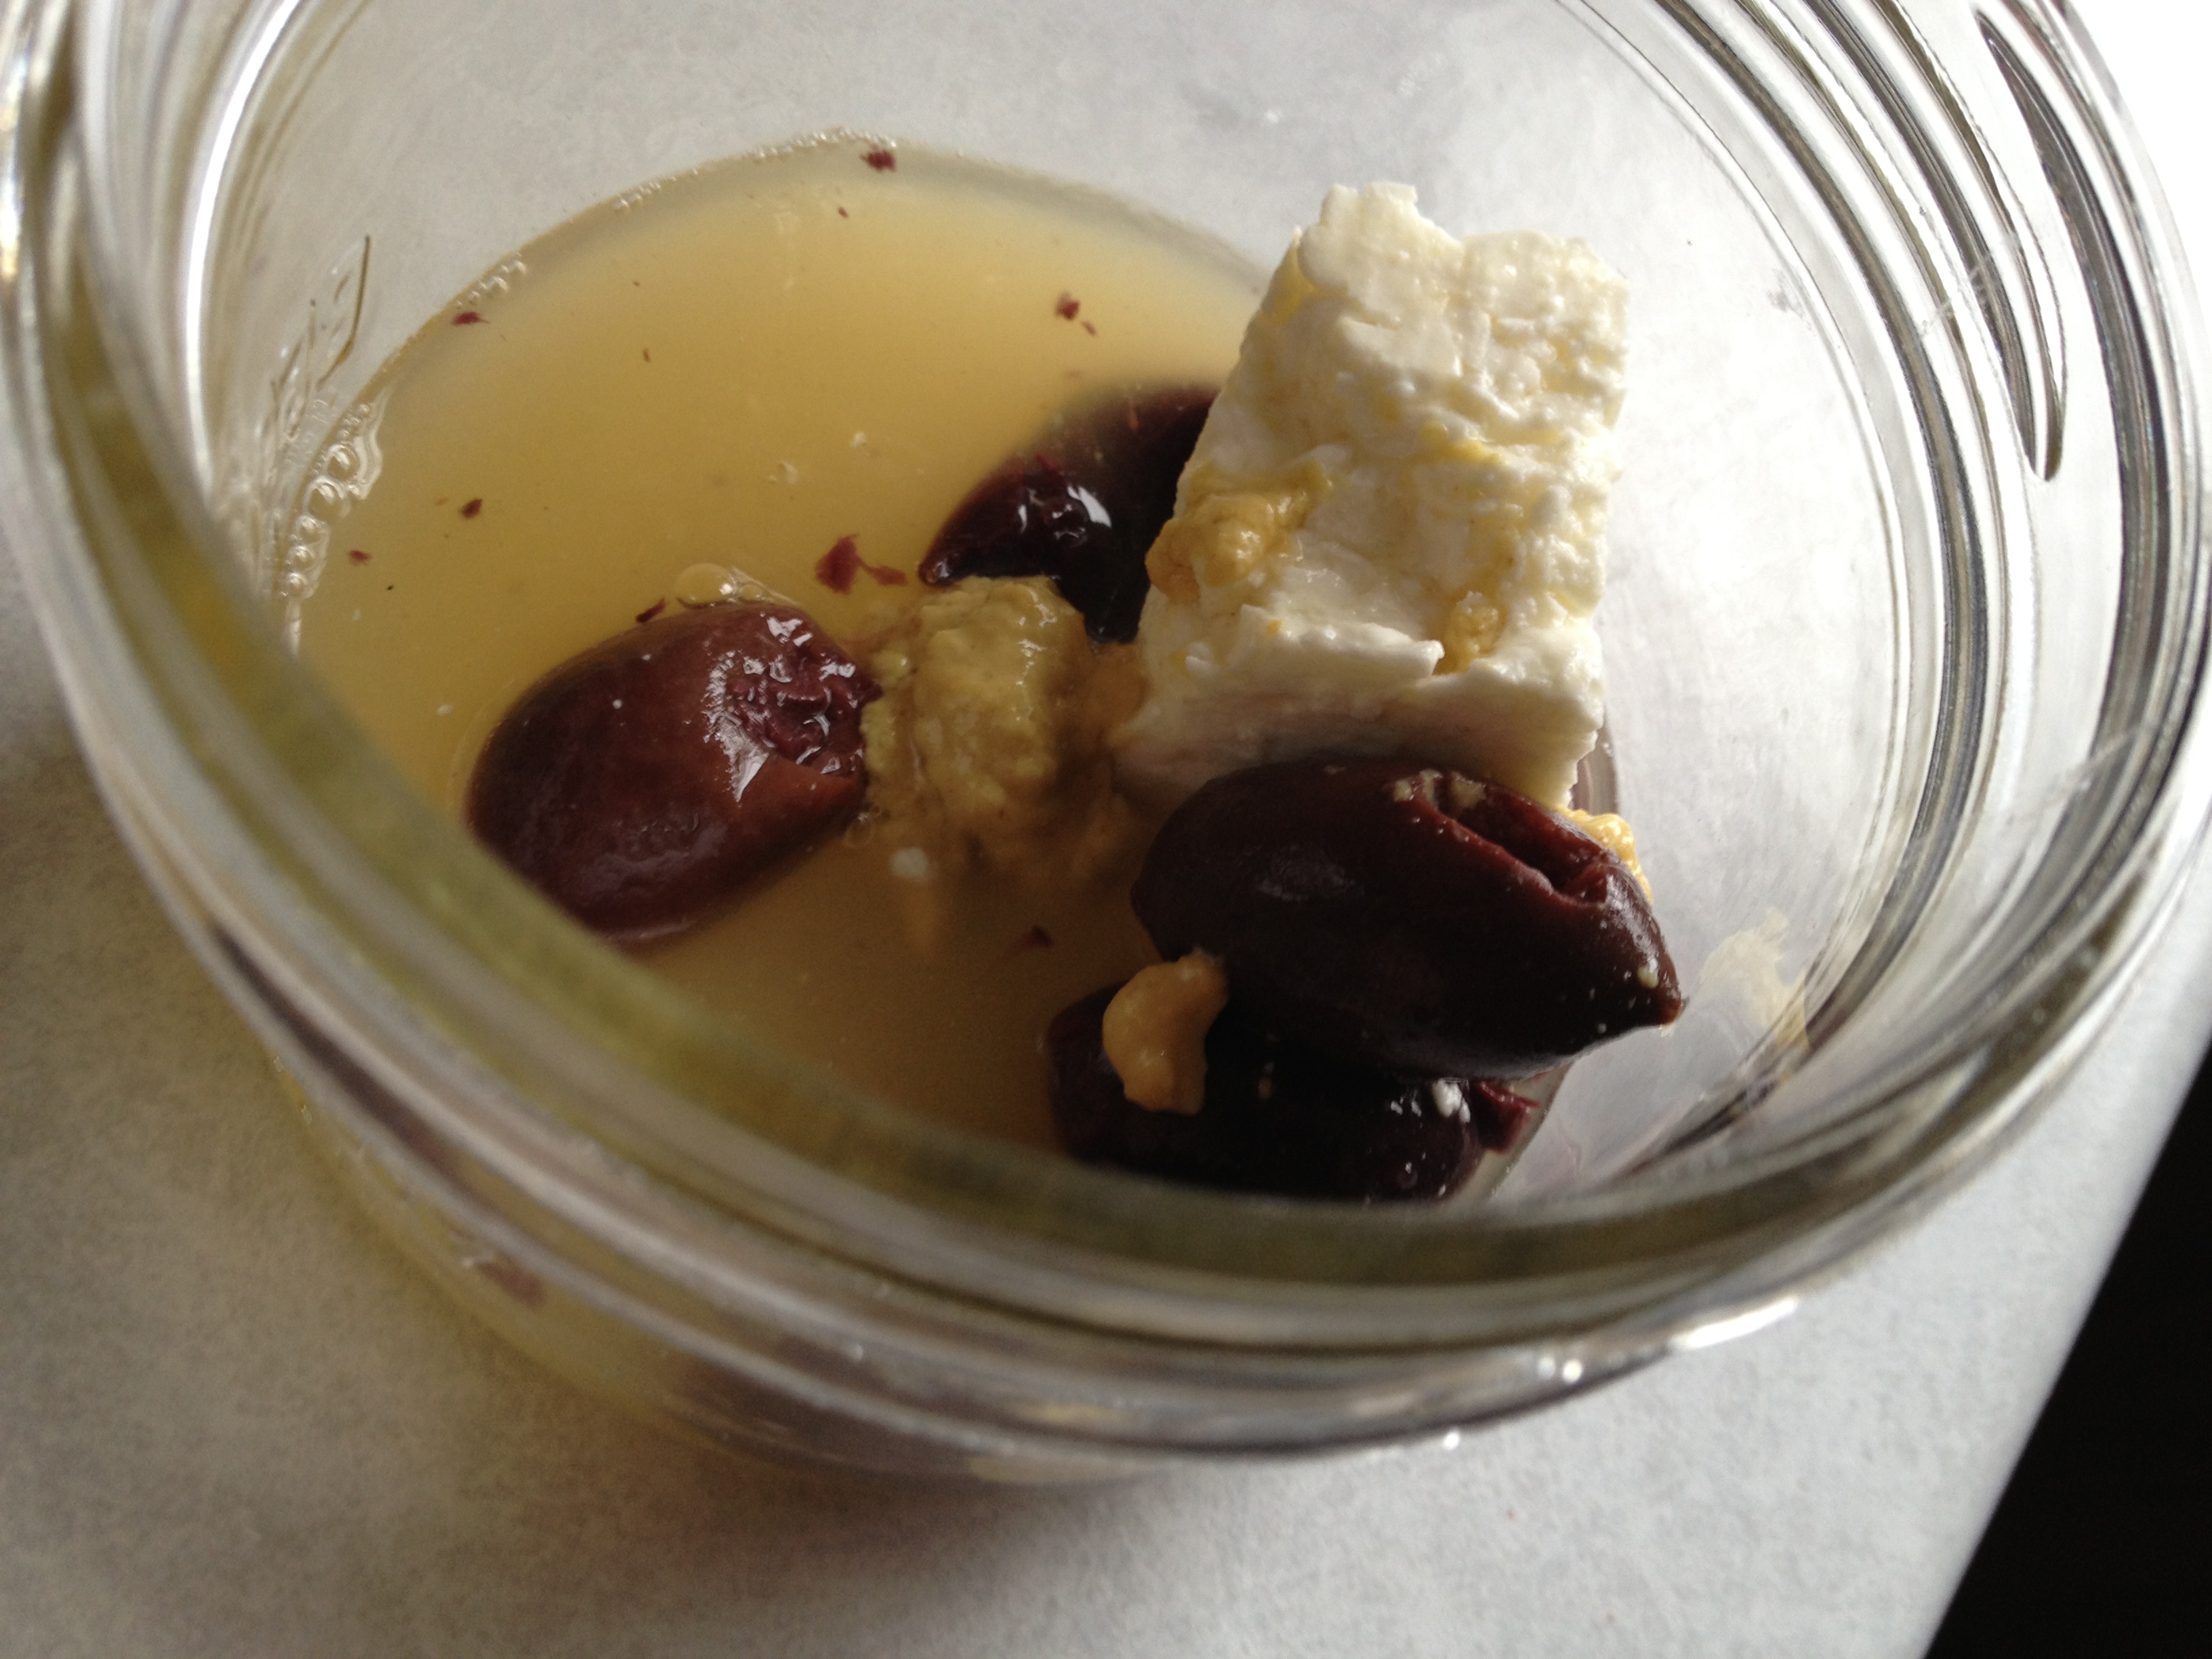
150 ml (5 oz) canned whole baby clams

2 cloves garlic, sliced thinly

5 Tablespoons fresh parsley, minced

1 bunch fresh kale

120ml (4 oz) dry white wine or broth

1 Tablespoon butter

5 Tablespoons olive oil

Salt and pepper to taste

Method:

1. Bring salted water to a boil. Wash and tear up kale into bite size pieces, discarding the spines.

2. Melt butter and olive oil in a large sauté pan on medium. Add sliced garlic and sauté until golden.

3. Blanch kale in boiling salted water for 1 minute. Add parsley, wine or broth, clam nectar (from the can) to the garlic pan and transfer kale with a slotted spoon from pot to pan

. Simmer for 5 minutes.

4. Add pasta to same pot of boiling water. Add clams to sauté pan and salt and pepper to taste then simmer for another 5 minutes.

5. Add pasta to saute pan with sauce and allow to sit with burner off until most of the sauce is absorbed.

6. Serve with freshly grated parmesan cheese.

Do you have a treasured recipe that you’ve ‘greened’?

Clam Linguine with Greenery by Kitchenette Finds

Clam Linguine with Greenery by Kitchenette Finds

Related articles

Advertisement

Old Fashioned Gluten Free Cornbread from Gluten Free on a Shoestring

Posted on
Gluten Free Cornbread baked by Kitchenette Finds

Gluten Free Cornbread baked by Kitchenette Finds

I just had to share this recipe that I found on Gluten Free on a Shoestring, a really wonderful blog by Gluten Free cookbook author Nicole Hunn. The cornbread disappeared in under 24 hours, which is a new record in our house!

The only change I made was to use Greek Yogurt instead of plain yogurt. It was super simple and easy to throw together and went very well with Black Bean Chili we had for dinner, and with a smear of honey for dessert and topped with butter next to scrambled eggs for breakfast the next morning.

Prep time: 5 minutes       Cook time: 30 minutes       Yield: 1 cornbread

Ingredients

2 cups (264 g) coarsely ground yellow cornmeal

1 teaspoon kosher salt

1 teaspoon baking soda

2 teaspoons baking powder

1 egg (60 g, out of shell) at room temperature, beaten

4 tablespoons (56 g) unsalted butter, melted and cooled

1 1/2 cups (340 g) plain yogurt, at room temperature (can substitute an equal amount of sour cream or buttermilk)

4 tablespoons (84 g) honey

For the complete recipe please click through to Old Fashioned Gluten Free Cornbread on Gluten Free on a Shoestring.

What is your favourite thing to put on or eat with cornbread? Chili? Honey? Cheese? Butter?

Photo of Old Fashioned Gluten Free Cornbread from Gluten Free on a Shoestring

Shamrock Smoothie

Posted on

Shamrock Smoothie - Kitchenette Finds

There is a certain fast food chain that celebrates St. Patrick’s Day with a suspicious green sludge dubbed the “Shamrock Shake”, while I admit to having consumed one or two in my reckless youth, I’m no longer foolish enough to put the 54 ingredients that add up to 820 calories of no-goodness into my body. Especially not when I’ve created a delicous and very healthy drink I’m calling the Shamrock Smoothie.

Shamrock Smoothie - Kitchenette Finds

I came up with this smoothie when my 10 year old, Young Fresh Chef, was getting bored with all my fruity smoothie combinations. I was looking through my baking cupboard trying to come up with something fresh when I spied raw cacao powder and mint extract. I am a big fan of mint and chocolate together so I knew I could make something wonderful.

Shamrock Smoothie - Kitchenette FindsI’ve been adding frozen baby spinach (the kind you buy fresh in the plastic tub) for over a year with my son’s knowledge and approval and when I recently tried frozen kale it got a thumbs up as well. I used frozen bananas as the only source of sweetness and almond milk to help it blend better, but the chocolate and mint are the real stars!

IMG_9410

When I tested this on the Young Fresh Chef he finished it down to the last drop and declared it his favourite smoothie ever. So it’s definitely a winner. He couldn’t taste the kale at all, when it’s frozen it pretty much disintegrates when blended. By using bananas that were left to ripen until they were super sweet and then broken into chunks and frozen it could satisfy any sugary craving. I use raw cacao powder to get all the antioxidants and minerals that are usually lost when cocoa beans are roasted. Cocoa powder would still work in a pinch for the flavour.

Shamrock Smoothie

After sucking back this smoothie I always have a smile on my face and a spring in my step. It’s a much better feeling than what you would get after a visit to your local heart attack shack and your body will thank you for years to come.

Recipe for Shamrock Smoothie

makes 1 serving

Ingredients:

1 frozen banana (very ripe)

1/2 cup almond milk (or milk of your preference)

2 handfuls of frozen kale (or frozen baby spinach or a combo)

2 drops of pure peppermint extract (or to taste, it’s powerful stuff!)

2 TBS chia gel (optional, I use 1 part chia to 6 parts water and keep the extra in the fridge for up to a week)

Method:

1. Blend all ingredients in a glass or mason jar with an immersion blender (or in a blender)

2. Enjoy!

Shamrock Smoothie  - Kitchenette FindsWhat are some other sweet ways you get your greens?

Happy Pi Day!

Posted on
The Perils of Peach Pie

The Perils of Peach Pie

March 14th is Pi day (3.14), I hope you are celebrating with real pie, I’m just sticking with pictures of pie. Up top is my Perfect Peach Pie and below is Not So Sour Cherry Pie. Enjoy!

Cherry Pie Serenade

Peanut Butter Cookie Cavalcade

Posted on
Peanut Butter Cookies on Parade

Peanut Butter Cookies on Parade

Twitter told me today that March 1st is Peanut Butter Lovers’ Day, not to be confused with Peanut Butter Day on January 24th. I was planning on making Peanut Butter Cookies anyway, but I decided to include my social networks in the process. I instagrammed, tweeted and facebooked and probably made some people drool in the process. Here are the Instagram photos with the accompanying tweets followed by the normal recipe.

Baking Peanut Butter Cookies for #PeanutButterLoversDay preheating oven to 375 as I tweet

Baking Peanut Butter Cookies for #PeanutButterLoversDay preheating oven to 375 as I tweet

Mixing 1/2 cup each of soft butter, light brown sugar & creamed honey for #PeanutButterLoversDay cookies

Mixing 1/2 cup each of soft butter, light brown sugar & creamed honey for #PeanutButterLoversDay cookies

1 egg, 1 cub pb, 1/2 tsp each bkng soda, vanilla & salt to butter, sugar & honey for #PeanutButterLoversDay

1 egg, 1 cub pb, 1/2 tsp each bkng soda, vanilla & salt to butter, sugar & honey for #PeanutButterLoversDay

Adding 1 cup of ap flour means the #PeanutButterLoversDay cookie dough is almost ready to roll!

Adding 1 cup of ap flour means the #PeanutButterLoversDay cookie dough is almost ready to roll!

Use wet hands to form 1TBS of #PeanutButterLoversDay cookie dough into rough ball shapes

Use wet hands to form 1TBS of #PeanutButterLoversDay cookie dough into rough ball shapes

Press wet fork in a # pattern on the balls of #PeanutButterLoversDay cookie dough. Bake @ 375 for 10-12 minutes

Press wet fork in a # pattern on the balls of #PeanutButterLoversDay cookie dough. Bake @ 375 for 10-12 minutes

#PeanutButterLoversDay cookies cooling. Help yourself to a virtual cookie to celebrate!

#PeanutButterLoversDay cookies cooling. Help yourself to a virtual cookie to celebrate!

Recipe for Peanut Butter Cookies

makes about 3 dozen

Ingredients:

1/2 cup soft butter

1/2 cup brown sugar – packed (I prefer light brown)

1/2 cup honey (the written recipe says 1/2 cup white sugar, but I always use honey)

1 egg

1 cup peanut butter

1/2 tsp kosher salt (or to taste)

1/2 tsp baking soda

1/2 tsp vanilla (or to taste)

1 cup all-purpose flour

Method:

1. Preheat oven to 375.

2.Cream butter with sugar (and honey if using instead of 1/2 cup sugar).

3. Beat in egg, peanut butter, salt, baking soda and vanilla.

4. Add flour.

5. Roll about 1 Tablespoon of dough into balls with wet hands and place with lots of space between on a cookie sheet.

6. Press a wet fork gently in a cross pattern on the balls of dough.

7. Sprinkle with kosher salt (optional)

8. Bake for 10 to 12 minutes or until the bottoms are golden brown.

What’s your favourite way to use peanut butter?

Olive Greek Salad Dressing

Posted on

IMG_2089

Cooks always start by mastering the Garde Manger station, our home kitchen is no exception. I started my son, Young Fresh Chef, on salads and appetizers. My mother, Momette, has always made salad dressings from scratch and I’ve continued the tradition. Years ago, when I was making a vinaigrette with my son, he couldn’t have been any older than 6, he asked why I didn’t add some of the olive juice from the bottle of Kalamata olives that I was using from the salad. I’d never considered adding the brine as an acidic element, so I splashed some into the dressing and it was fantastic!

Olive Salad Dressing Ingredients

Later, when we told his dad, Exec Chef about our latest creation there was a glint in his eye that a new menu item was about to appear at his restaurant. It was the first time that our son had inspired a dish and he was as proud as physically possible to be a part of the creative process.

Lately, I’ve been trying to healthify (this is now a word) our food at home and one way is by cooking with fats from whole foods (nuts, seeds, avocados, etc) rather than using extracted fats (butter, oil, shortening, etc). When trying to make a new type of salad dressing, I thought back to the flavours that I loved to put together and, of course, I thought of the olive juice salad dressing. Why not use whole olives instead of olive oil?

I decided to go with a Greek flavour profile, based around Kalamata olives. So, I threw together some fresh squeezed lemon juice, Dijon mustard, a bit of feta cheese, some Kalamata olives, salt and pepper in a little jar and blended it together with my immersion blender.

Blended Olive Salad DressingI topped a salad of romaine lettuce, purple cabbage, shredded carrot and celery with some of the dressing and I couldn’t believe the amazing olive and feta flavour that was delivered with every bite. Usually, when I add whole olives to a salad I try to space them out to get maximum enjoyment. With the blended olive dressing, I felt like every forkful was filled with salty tang of Greece.

Enjoying Olive Greek Dressing

Cranberry Craze

Posted on

When the leaves twist and turn and fall into colourful piles, waiting for boots to crunch their way through, it’s time to prepare for comfort food simmering on the stove. Years ago we started a tradition for Thanksgiving and Christmas that Young Fresh Chef and I make a batch of homemade cranberry sauce. Mostly I do the prepping and cooking and he just lets me know when it is sweet enough. I had always been a fan of the canned variety, piling it on turkey sandwiches and maybe even eating a spoonful on the sly. 

But when you look at the ingredient list on the can it is short and sweet: CRANBERRIES, GLUCOSE-FRUCTOSE, GLUCOSE, WATER. I knew I could do better. I researched recipes years ago and I took the bits and pieces that appealed to me and created my ultimate cranberry sauce! The least daunting of the traditional turkey accompaniments, it’s a great take along if you are invited to a holiday feast.

Living in the heart of B.C.’s cranberry country, I can usually buy cranberries in the Fall, fresh from the bog, at the local Farmers’ Market. They are also easy to find in the produce section in your grocery store this time of year. I usually pick up some extra to fill a vase or pile around a pillar candle for a centre-piece.

Once you have the cranberries, next come the seasonings, and while it is necessary to add some sweetener to balance out the pucker inducing tartness of the berries, you can also add some holiday spice to add layers of flavour. The key to keeping it on the savoury side instead of being jelly is bay leaf and white peppercorns. By placing the smaller spices in a tea ball (or a cheese cloth pouch) you don’t have to fish them out individually, or wonder where that last clove is hiding.

While cranberry sauce completes the holiday table and elevates turkey to a special occasion, it’s also great mixed in with yogurt and granola, slathered on a peanut butter sandwich or maybe just a straight spoonful or two!

Recipe for Spiced Cranberry Sauce

Ingredients:

1 12-ounce bag of fresh cranberries

1 3/4 cups apple cider or juice

3/4 cup honey (or other sweetener to taste)

1 cinnamon stick, broken in half

zest of 1 unsprayed/organic orange

3 whole cloves

4 white or black whole peppercorns

2 bay leaves

1 piece of nutmeg seed (optional)

1 thread of mace (optional)

1 allspice berry (optional)

1 star anise pod (optional)

3 cardamom pods (optional)

1 piece crystallized ginger (optional)

salt to taste

Method:

1. Place small spices in a tea ball or make a cheesecloth pouch tied with string.

2. Place all ingredients in heavy large saucepan.

3. Bring to a boil over medium heat.

4. Simmer until berries burst and sauce thickens, stirring occasionally (about 20-25 minutes).

5. Remove cinnamon stick, bay leaves and spices.

6. Allow to cool, the sauce will thicken up even more.

7. Refrigerate sauce until cold.

8. Serve with turkey, or yogurt or swirl into muffin batter!

The sauce can be made up to 3 days ahead. Cover and keep refrigerated.

Share your favourite homemade holiday tradition in the comments.

Black Bean Brownie Bandwagon

Posted on

I’ve noticed lots of recipes for Black Bean Brownies all over the internet. Some are just regular old butter and sugar brownie recipes while others are vegan, gluten-free, carob recipes. I was looking for something in between. Now, I’m not a big fan of sneaking healthy stuff into treats. I’m more of an eat yer veggies and then enjoy a homemade dessert kind of gal. But, I was going to a barbeque where there was one child with diabetes and another on a gluten free diet. I really wanted to take a dessert that they could both dig into and that maybe even some of the grown ups might enjoy.

I couldn’t find the perfect recipe online, so I concocted my own cobbled together version. They were pretty easy to make, but I did a test run to make sure they’d be good enough to share. When my son, the Young Fresh Chef, tried his first one I asked him what he thought the secret ingredient was. He chewed and thought, then guessed, “Plums?” (We had just bought some gorgeous purple plums) When I told him it was black beans, he shrugged, nodded and ate another one.

All the kids at the barbeque were intrigued by the concept of beans in brownies.After dinner, the bars disappeared rather quickly and there were lots of dimpled chocolate dusted cheeks and whispered requests for the recipe. I even got my husband, the Executive Chef, to try a bite and his, “Not as bad as I thought it would be.” was higher praise than I had ever hoped. Though he totally objects to them being called brownies, he will tolerate the term “bars”.

Black Bean Brownies

I used dried beans that I cooked in my slow cooker with no pre-soak and it took about 6 hours. While the beans were cooling I added a vanilla bean so they would suck up the flavour.

The sweetener can be tweaked to your own taste or what’s available in your pantry. I try to use small amounts of different sweeteners so that there isn’t a predominant taste of any one.

These could also be veganized by using an egg substitute.

Ingredients:

3 eggs

1/2 cup cocoa powder or cacao powder

1/2 cup walnuts

1 Tablespoon vanilla extract

1/2 teaspoon baking soda

3 Tablespoons coconut oil

4 Medjool dates (approximately 1/4 cup)

1/4 cup coconut sugar

1/4 cup agave syrup

1/4 cup xylitol

2 cups black beans (rinsed, if canned)

1/2 teaspoon Kosher salt

1/4 teaspoon maple syrup extract

Method:

1. Preheat oven to 325.

2. Line a 11X13 baking pan with parchment paper.

3. Place all of the ingredients in a high-powered blender or food processor and blend until fully combined and the beans and walnuts are indistinguishable.

4. Scrape the mixture into the lined pan. Bake until the middle has set, about 30-45 minutes. Let cool COMPLETELY before cutting.

I cut them up into 24 rectangles and froze the extra ones in snack size bags inside one large freezer bag for school lunches.

These taste even better with a smear of peanut butter, you know, if you’re into that kind of thing!

Virtual Chocolate Chip Cookies for Father’s Day

Posted on

Happy Father’s Day to all the dads! I hope you get something sweet to thank you for all the parenting you do. If you need to drop a hint, here’s a link for a fantastic chocolate chip cookie recipe.

Just remember to share a few with your kids!

Earth Angel Food Cake

Posted on


There is the family you are born into (or adopted into) that you make the best of and there is the family you create that you try to make the best. I was luckily born into a family that accepts me for who I am and loves me for all I am. Each passing year I grow to appreciate them more and more. Luck is less a part of the family I’ve made with my friends and my husband and more about learning and growing. I’ve surrounded myself with people who are worth the effort and never stop trying to show them how much I care.

Once in a while a moment comes when I’m forced to consider what my days would be like without certain people in my life. I’m a contingency planner and I usually have plans B through Z ready to go. But trying to picture picking up the pieces and putting them back together without the corner pieces means it will never be complete again.

So, how do I show the people I love with every beat of my little heart the depth of what they mean to me? I bake. I measure and mix and blend and fold and frost and fret. You are what you eat and I want them to taste the love I attempt to infuse in every morsel. Loving someone with all your heart is to risk breaking it while attempting a new recipe is a risk baking it.

I never liked angel food cake. Mostly, I’d sampled grocery store versions or ones that tasted like the box they came in. I liked the name and the look, but had never enjoyed the taste. I found it dry and spongy with a fake almond-ish aroma with no real flavour to savour. I’d never thought of trying to make one, because I didn’t see the point. Then I had a request for one from a lovely someone celebrating an extra extraordinary birthday. Now, as much as I like to cook and bake for friends, loved ones and random strangers, I rarely take requests. It’s more about a recipe that I’ve been waiting for an opportunity to try, or an ingredient that I need to use up.

When venturing into new recipe territory I call on my trusted baking reference Baking Illustrated: The Practical Kitchen Companion for the Home Baker which I love for its breakdown and explanation of how they tested and re-tested their version of the classics and the thought process behind the evolution. With their recipe for a blueprint, I then searched the Internet for sure-fire tips and tricks to make it as fool-proof as possible. The most useful answers I found were on the America’s Test Kitchen Feed website. Not surprising, since America’s Test Kitchen is the crew behind Baking Illustrated!

Technique and tasks down, I just needed the tools. Thankfully my thoughtful and hopeful husband had given me my first food processor for Christmas and my Mother’s Day Kitchen Aid Mixer without which I probably would not have dared to take on the Angel Food Cake challenge. The last key item was an Angel Food Cake pan that had belonged to my Mother-In-Law, so I was confident it was imbued with baking magic as she was the most gifted home baker I’ve ever seen.

I baked the cake the night before the momentous birthday and let it cool overnight. In the morning I tossed together a citrus salad with tangerines, oranges, Meyer lemons, sweet limes, pink grapefruit and pomelo. A touch of honey and a pinch of kosher salt balanced the flavours. The Kitchen Aid mixer was put to use again to quickly whip some organic heavy cream with powdered sugar, homemade vanilla extract and a smidgen of kosher salt.

I admit that I was a bit nervous when I gently cut into the cake with a serrated knife. Would it be mushy in the middle? Overly dry? No. It was heavenly. I finally understood that Angel Food Cake is just a moist meringue given structure by the flour. The vanilla, lemon and almond came together in a celestial harmony that had me savouring every bite. The slightly sweetened whipped cream and the brightly flavoured citrus salad made each forkful an enjoyable combination of texture and tastes. The cake was a hit! Watching some of my favourite people on this planet enjoying my very first Angel Food Cake made my heart soar high above the clouds.

Ingredients:

1 cup (3 ounces) plain cake flour

1 1/2 cups (10 1/2 ounces) sugar

12 LARGE egg whites (1 3/4 cups plus 2 Tablespoons) at room temperature

1 teaspoon cream of tartar

1/4 teaspoon salt

1 1/2 teaspoons vanilla extract

1 1/2 teaspoons juice from 1 lemon

1/4 teaspoon almond extract

Method:

1. Preheat oven to 325 once oven rack is in the lower-middle position. Have an UNgreased tube pan (9 inch diameter, 16 cup capacity) at the ready. Removable bottom pans are best, but if not an option then line with parchment paper.

2. Process granulated sugar in a food processor until powdery. Remove about half of the sugar and reserve in a small bowl.

3. Add the flour to the food processor and aerate them until mixed and fluffy.

4. Beat the egg whites at low-speed until just broken up and beginning to froth. Add the cream of tartar and salt and continue to beat at medium speed until soft, billowy mounds form. Still at medium speed, beat in the reserved sugar, 1 Tablespoon at a time and mix until soft shiny peaks form. Add the vanilla, lemon juice and almond extract, beat until blended.

5. Sift the flour-sugar mixture oven the beaten egg whites in three additions  gently folding the flour-sugar mixture in after each addition with rubber spatula.

6. Scrape the cake batter into the pan gently and smooth the top with the spatula then give the pan a couple of raps on the counter to release any large air bubbles.

7. Bake until the cake is golden brown and the top springs back when firmly pressed (50-60 minutes).

8. If the cake pan has feet around the rim, invert the pan so it rests on them. If there are no feet invert the pan onto the neck of a bottle. Let the cake cool completely, 2 to 3 hours.

9. Once cool, run a knife around the edge of the pan. Slide the cake out and cut around the removable bottom or peel off the parchment. Use a serrated knife to cut, serve the same day.

%d bloggers like this: